Overview
This complete 2026 guide explains what Utah homeowners actually pay for basement electrical rough-in. It covers real pricing, what is included, common surprises that blow budgets, Utah-specific code requirements, how electrical work fits into the overall finishing timeline, future-proofing options, and honest stories from local families who have gone through the process. Whether you are planning a simple rec room or a full apartment-style basement, this article gives you the practical information you need before you start.
Table of Contents
- Why Electrical Rough-In Matters More Than Most People Think
- What Exactly Is Included in Basement Electrical Rough-In?
- How Much Does Basement Electrical Rough-In Cost in Utah in 2026?
- Real Cost Breakdown: Labor, Materials, Permits, and Panel Upgrades
- Common Surprises That Blow Up Electrical Budgets in Utah
- DIY vs Hiring an Electrician: What Utah Homeowners Actually Experience
- Timeline and Coordination with Framing, Insulation, and Drywall
- Future-Proofing Your Electrical for EV Chargers, ADUs, and Smart Homes
- Frequently Asked Questions About Basement Electrical Rough-In in Utah
Finishing a basement in Utah is exciting until the electrical quote comes in and suddenly the numbers feel a lot bigger than you expected. Electrical rough-in is one of those parts of the project that homeowners often underestimate, both in cost and in how much it affects everything else that comes after.
Why Electrical Rough-In Matters More Than Most People Think
Electrical rough-in is one of those parts of a basement finishing project that many homeowners do not think much about until they see the bill or run into problems later. It is the behind-the-scenes work that makes everything else possible, and getting it right (or wrong) has a bigger impact on your budget, timeline, and future satisfaction than most people expect.
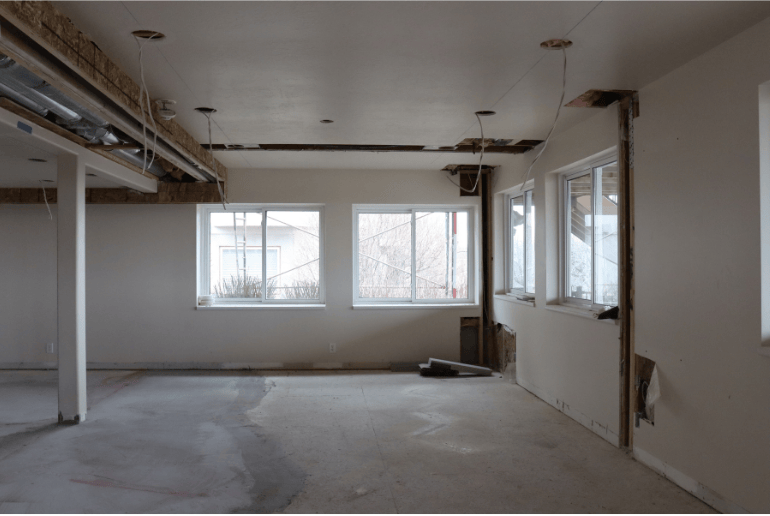
What Actually Happens During Rough-In
Rough-in is the stage that happens after the walls are framed but before insulation and drywall are installed. This is when the electrician runs all the wiring through the studs and ceiling joists, installs the boxes for outlets and switches, and sets up the foundation for every light, appliance, and device you will use later.
- All wiring gets pulled and secured in the open framing.
- Electrical boxes are placed exactly where outlets, switches, and lights will eventually go.
- Dedicated circuits are run for high-draw items like bathroom heaters, kitchenette appliances, or EV chargers.
- Smoke and carbon monoxide detectors are wired (hardwired with battery backup per Utah code).
- A subpanel is often installed if your main electrical panel does not have enough capacity.
Once the drywall goes up, all of this work is hidden. Making changes after that point becomes significantly more expensive and disruptive.
Why Timing Matters So Much
Electrical rough-in has to happen at a very specific point in the project timeline. If it is done too early, it is hard to know exactly where outlets and lights should go. If it is done too late, you end up cutting into finished walls or paying premium prices for last-minute changes.
- Rough-in typically happens right after framing is complete.
- It needs to be finished and inspected before insulation and drywall can start.
- Any delays in electrical work can push back the entire project timeline.
- Good coordination between your electrician and framing crew saves time and money.
The Utah Panel Problem Most Homeowners Do Not See Coming
One of the biggest surprises for Utah homeowners finishing their basements is the condition of their existing electrical panel. Many homes built before the early 2000s still have 100 or 150 amp panels. These panels were perfectly fine when the house was built, but they often cannot handle the additional load from a finished basement.
| Situation | What Usually Happens | Typical Extra Cost |
|---|---|---|
| Old 100–150 amp panel | Cannot safely handle new basement circuits | $2,500 – $6,000 for subpanel or upgrade |
| Adding bathroom + wet bar | Requires multiple dedicated circuits | $800 – $1,800 extra |
| Planning for EV charger later | Needs 40–60 amp dedicated circuit + proper wire size | $400 – $1,200 if done during rough-in |
| No panel upgrade planned | Inspector fails rough-in or future overload risk | Project delays + higher eventual cost |
This single issue has surprised more Utah homeowners during basement projects than almost anything else. Many people budget for outlets and lights but completely miss the panel capacity problem until the electrician or inspector brings it up.
How Rough-In Affects Everything Else
Electrical rough-in does not happen in isolation. It directly affects the cost and timeline of insulation, drywall, HVAC, and even plumbing work.
- HVAC ducts and plumbing lines often need to be coordinated with electrical runs.
- Insulation installers need to work around wires without damaging them.
- Drywall crews need to know exactly where boxes are located so they do not cover them up.
- Any mistakes or changes during rough-in usually create ripple effects for every trade that follows.
When electrical rough-in is well planned and properly executed, the rest of the basement finishing project tends to go much more smoothly. When it is rushed or poorly coordinated, it often becomes the source of delays and extra costs later on.
What Exactly Is Included in Basement Electrical Rough-In?
Rough-in is the behind-the-scenes electrical work that happens while the walls are still open. It is very different from the finished electrical work you see at the end of a project. Understanding exactly what is included (and what is not) helps you avoid confusion when comparing quotes and planning your budget.
What Rough-In Actually Covers
During rough-in, the electrician focuses on getting all the wiring and boxes in place before anything is covered up. Here is what is typically included:
- Running all wiring — This includes pulling NM cable (Romex) or conduit through studs, joists, and along the framing. Wires are secured properly and protected from physical damage.
- Installing electrical boxes — Boxes for outlets, switches, light fixtures, smoke detectors, and CO alarms are mounted at the correct heights and locations.
- Dedicated circuits — Separate circuits are run for bathrooms (GFCI protected), kitchenettes, laundry areas, and any high-draw appliances like electric heaters or future EV chargers.
- GFCI and AFCI protection — Ground-fault and arc-fault circuit interrupter protection is installed where required by Utah-adopted electrical code, especially in unfinished areas and bedrooms.
- Smoke and carbon monoxide detectors — Hardwired detectors with battery backup are installed and interconnected as required for bedrooms and each level of the home.
- Subpanel installation (when needed) — If your main electrical panel does not have enough capacity or available breaker spaces, a subpanel is installed and fed from the main panel.
- Proper grounding and bonding — All new wiring is properly grounded and bonded according to current Utah electrical code requirements.
- Permits and rough-in inspection — The work is permitted through your local building department and scheduled for a rough-in inspection before insulation and drywall begin.
Rough-In vs Finish Electrical Work
Many homeowners get confused between rough-in and finish work. Here is a clear comparison:
| Task | Included in Rough-In? | When It Happens |
|---|---|---|
| Running wires through framing | Yes | During rough-in (walls open) |
| Installing electrical boxes | Yes | During rough-in |
| Installing outlets, switches, and light fixtures | No | During finish electrical (after drywall and paint) |
| Installing trim plates and covers | No | Finish electrical phase |
| Final connections and testing | No | Finish electrical phase |
| Smoke/CO detector installation | Yes (wiring + boxes) | Rough-in (devices often installed later) |
| Subpanel and main panel work | Yes | During rough-in |
What Is NOT Included in Rough-In
It is important to understand what rough-in does not cover so you are not surprised later:
- Actual outlets, switches, and light fixtures (these are installed after drywall and paint).
- Trim plates and decorative covers.
- Final wiring connections to devices and testing of the complete system.
- Any low-voltage wiring (network cables, speaker wire, security systems) unless specifically included in the quote.
- Appliance hookups (dryer, range, EV charger) — these usually happen during finish work.
Why This Distinction Matters
When you are comparing quotes from electricians or general contractors, make sure you understand exactly what phase of work is being priced. Some quotes only cover rough-in, while others include both rough-in and finish work. Knowing the difference helps you budget accurately and avoid surprises when the project moves into the finish stage.
In Utah, electrical rough-in is almost always done while the framing is still exposed. This is the most efficient and cost-effective time to run wires and install boxes. Once the walls are closed up, any changes become much more expensive and time-consuming.
How Much Does Basement Electrical Rough-In Cost in Utah in 2026?
In 2026, electrical rough-in costs for basement projects in Utah vary quite a bit depending on the size of the space, the condition of your existing electrical system, and how many dedicated circuits you need. Most homeowners are seeing prices in these general ranges:
| Basement Size | Typical Electrical Rough-In Cost | Common Additional Costs |
|---|---|---|
| 500 – 700 sq ft | $2,800 – $5,500 | Panel upgrade ($2,500–$4,000) is common in older homes |
| 800 – 1,200 sq ft | $4,500 – $9,000 | Subpanel often required; EV charger prep adds $400–$1,200 |
| 1,300 – 1,800+ sq ft | $8,000 – $14,000+ | Larger layouts, more circuits, possible main panel upgrade |
What Typically Drives the Price Up or Down?
Several factors influence the final cost of basement electrical rough-in in Utah:
- Condition of your existing panel — Homes with 100 or 150 amp panels often need a subpanel or full upgrade, which can add $2,500 to $6,000.
- Number of dedicated circuits needed — Bathrooms, kitchenettes, laundry, and future EV chargers each require their own circuit and add cost.
- Complexity of the layout — More walls, odd angles, and low ceilings increase labor time.
- Whether you need a subpanel — This is one of the most common added expenses in Utah basements.
- Permits and inspections — Usually $150 to $450 depending on your city or county.
- Future-proofing requests — Adding conduit or extra circuits for EV chargers or ADUs increases the upfront cost but saves money later.
Real-World Examples from Utah Homeowners
Here are a few examples of what actual families have experienced:
A family in Lehi budgeted $4,500 for electrical on their 900 square foot basement. They received a lower quote from someone who was not a licensed electrician. Three weeks into the project, the city inspector failed the rough-in because the existing panel did not have enough capacity. They ended up paying almost $9,000 total once they brought in a licensed electrician to install a proper subpanel and correct the work. They later said choosing the cheapest quote ended up being the most expensive decision they made during the entire basement project.
Another common scenario in Utah is homeowners who plan for basic lighting and outlets but forget that adding a bathroom or wet bar requires multiple dedicated circuits. These additions can easily push a project from the lower end of the price range into the higher end.
How to Get More Accurate Pricing
The best way to know what your specific project will cost is to get detailed quotes from licensed electricians who are familiar with Utah basement work. When you request quotes, make sure to provide:
- The size of your basement and basic layout.
- Whether you plan to add a bathroom, wet bar, or laundry area.
- If you want to prepare for an EV charger or future ADU.
- The age of your home and whether you know your current panel size.
Getting clear, itemized quotes helps you understand exactly what you are paying for and avoids unpleasant surprises once the work begins.
Real Cost Breakdown: Labor, Materials, Permits, and Panel Upgrades
Understanding what makes up the total cost of basement electrical rough-in helps you compare quotes more accurately and plan your budget. In Utah in 2026, here is a realistic breakdown of where the money typically goes:
Labor Costs
Labor is usually the largest portion of the total cost for electrical rough-in.
- Electricians in Utah typically charge between $45 and $90 per hour for rough-in work.
- Most basement projects take between 30 and 70 hours depending on the size and complexity of the layout.
- More complex jobs (multiple dedicated circuits, subpanel installation, awkward framing) take longer and cost more in labor.
- Labor rates can be slightly higher in Salt Lake County and Utah County compared to more rural areas.
Materials (Wire, Boxes, Breakers, and Panels)
Material costs vary depending on the quality of products used and how many circuits are needed.
- Basic materials (wire, boxes, staples, connectors) usually run between $800 and $2,500 for a typical basement.
- Higher-quality wire, AFCI/GFCI breakers, and better boxes increase material costs but can be worth it for long-term reliability.
- If a subpanel is required, material costs for the panel, breaker, and feeder wire can add $600 to $1,500 on their own.
Subpanel and Feeder Costs
This is one of the most common added expenses in Utah basement projects, especially in homes built before 2005.
- Installing a subpanel with feeder typically costs between $1,800 and $4,500 total (materials + labor).
- The price depends on the amperage needed (usually 60–125 amps for a basement), the distance from the main panel, and whether any upgrades to the main panel are also required.
- Many older Utah homes need this upgrade because the original panel simply does not have enough capacity or available breaker spaces for a finished basement.
Permits and Inspections
Electrical work in Utah almost always requires permits and inspections.
- Permit and inspection fees usually range from $150 to $450 depending on the city or county.
- Some cities charge flat fees, while others base the cost on the value of the work being done.
- Skipping permits to save money is risky — failed inspections later can end up costing more in corrections and delays.
Dedicated Circuits
Dedicated circuits are required for certain areas and appliances. Each one adds cost.
- Bathroom circuits (GFCI protected): Usually $400 – $800 each.
- Kitchenette or wet bar circuits: Typically $500 – $1,000 depending on the appliances planned.
- EV charger prep (40–60 amp circuit): Usually $400 – $1,200 if run during rough-in.
- Laundry circuits: Often $400 – $700.
| Cost Component | Typical Range | Notes |
|---|---|---|
| Labor | $45–$90 per hour | 30–70 hours typical for most basements |
| Materials | $800 – $2,500 | Wire, boxes, breakers, basic panels |
| Subpanel + Feeder | $1,800 – $4,500 | Very common in older Utah homes |
| Permits & Inspections | $150 – $450 | Varies by city/county |
| Dedicated Circuits | $400 – $1,200 each | Bathroom, kitchenette, EV charger, etc. |
How These Costs Add Up in Real Projects
For a typical 900–1,200 square foot basement in Utah, most homeowners end up with a total electrical rough-in cost somewhere between $5,000 and $10,000 when a subpanel is required. Projects that stay on the lower end usually have newer homes with sufficient panel capacity and relatively simple layouts. Projects that push toward the higher end often involve older panels, multiple dedicated circuits, or more complex layouts.
Understanding this breakdown helps you ask better questions when you receive quotes and gives you a clearer picture of where your money is going.
Common Surprises That Blow Up Electrical Budgets in Utah
Even when homeowners try to plan carefully, certain issues come up again and again during basement electrical rough-in in Utah. These surprises are responsible for more budget overruns than almost anything else. Knowing what to watch for can help you avoid the most common and expensive problems.
Old Electrical Panels That Cannot Handle the Load
This is by far the most common and expensive surprise Utah homeowners face. Many homes built before the early 2000s still have 100 or 150 amp main panels. These panels were adequate when the house was built, but they often cannot safely support the additional circuits needed for a finished basement.
- Adding lighting, outlets, a bathroom, a wet bar, and possibly an EV charger can quickly overload an older panel.
- Inspectors will fail the rough-in if the panel does not have enough capacity or available breaker spaces.
- Installing a subpanel or upgrading the main panel usually costs between $2,500 and $6,000 — money many people did not budget for.
Existing Wiring That Does Not Meet Current Code
Some older homes still have aluminum wiring or circuits that do not meet today’s code requirements. When this is discovered during rough-in, it often means running new circuits instead of using existing ones.
- Aluminum wiring requires special connectors and handling, which adds time and cost.
- Undersized circuits or improper grounding may need to be completely replaced.
- This issue is more common in homes built before the mid-1980s.
Extra GFCI and AFCI Protection Requirements
Utah has adopted electrical code requirements that call for GFCI and AFCI protection in more places than many homeowners expect, especially in basements.
- Bedrooms require AFCI protection on outlets.
- Unfinished basement areas and any areas near water require GFCI protection.
- These specialized breakers cost more than standard breakers and can add several hundred dollars to the project.
Coordination Problems with Other Trades
When plumbing, HVAC, and electrical rough-in are all happening around the same time, poor coordination can create delays and extra costs.
- Ducts or pipes may block planned wire runs, requiring the electrician to reroute circuits.
- Work by one trade can damage wiring installed by another if communication is poor.
- These issues often lead to change orders and increased costs.
Low Headroom and Lighting Challenges
Many Utah basements have lower ceilings or areas with limited headroom. This can force more expensive lighting solutions than standard recessed lights.
- Standard recessed lights may not fit in low areas, requiring surface-mounted or alternative fixtures.
- Creative lighting solutions to work around ducts, beams, or low ceilings usually cost more.
- Planning lighting early with your electrician can help avoid these expensive workarounds.
| Common Surprise | Why It Happens | Typical Extra Cost |
|---|---|---|
| Old panel capacity | Homes built before 2005 often have 100–150 amp panels | $2,500 – $6,000 for subpanel or upgrade |
| Existing wiring issues | Aluminum wiring or outdated circuits in older homes | $1,000 – $4,000+ depending on scope |
| Extra GFCI/AFCI protection | Utah code requires it in more places than many expect | $300 – $800 in specialized breakers |
| Poor trade coordination | Plumbing/HVAC and electrical not planned together | $500 – $2,000 in rework and delays |
| Low headroom lighting | Standard recessed lights won’t fit in some areas | $400 – $1,500 for alternative fixtures |
A couple in Heber City thought they could save money by having the framing crew run some of the electrical wire before the electrician arrived. The inspector red-tagged the job because the wiring was not properly supported and some circuits were undersized. They had to pay the electrician extra to fix everything and still passed inspection two weeks later than planned. They said the “savings” ended up costing them more in the long run and created unnecessary stress during the project.
How to Avoid These Surprises
Most of these issues can be avoided or at least identified early with better planning:
- Have your electrician evaluate your existing panel capacity before the project starts.
- Make sure all trades (electrical, plumbing, HVAC) coordinate their rough-in work.
- Discuss lighting plans early, especially in areas with low headroom or ductwork.
- Work with licensed professionals who are familiar with Utah basement projects and local code requirements.
The families who experience the fewest surprises are usually the ones who asked detailed questions upfront and budgeted for the possibility of a panel upgrade from the beginning.

DIY vs Hiring an Electrician: What Utah Homeowners Actually Experience
Some parts of electrical rough-in are tempting to DIY, but Utah code is strict and inspections are thorough.
- Many handy homeowners successfully install boxes and run wire in straight runs.
- Panel work, subpanels, and anything involving the main service almost always requires a licensed electrician.
- DIY mistakes often show up during inspection and end up costing more to fix than hiring a pro from the start.
- Permits and inspections are still required even if you do the work yourself.
Timeline and Coordination with Framing, Insulation, and Drywall
Electrical rough-in does not happen in isolation. It is part of a sequence of work that includes framing, plumbing, HVAC, insulation, and drywall. How well these trades coordinate with each other has a major impact on your project timeline and final cost.
Typical Timeline for Basement Electrical Rough-In
In most Utah basement projects, electrical rough-in follows a fairly predictable schedule:
| Project Phase | When It Usually Happens | Typical Duration |
|---|---|---|
| Framing | First major phase after demolition | 1–3 weeks |
| Electrical Rough-In | Right after framing is complete | 3–10 working days |
| Plumbing & HVAC Rough-In | Often overlaps with electrical | 3–10 working days |
| Insulation | After all rough-ins pass inspection | 1–3 days |
| Drywall | After insulation is complete | 3–7 days (plus drying time) |
| Panel Upgrade (if needed) | Can happen during or after rough-in | Adds 1–3 weeks (utility scheduling) |
Why Good Coordination Matters
When electrical, plumbing, and HVAC rough-in are well coordinated, the project tends to move forward smoothly. When they are not, it often creates delays, extra costs, and frustration.
- Electricians, plumbers, and HVAC technicians often need to work in the same spaces at the same time. Poor planning can lead to one trade blocking another.
- Wiring may need to be rerouted if ducts or pipes are installed first without coordination.
- Inspectors may fail one trade’s work if another trade has created code violations (for example, plumbing lines too close to electrical wires).
- Delays in one area (especially electrical or plumbing) can push back insulation and drywall, which affects the entire project timeline.
Best Practices for Smooth Coordination
Homeowners can help keep things on track by making sure their contractor or trades are communicating well:
- Have a clear overall schedule that shows when each trade is expected to work.
- Make sure the electrician knows about any plumbing or HVAC plans (bathroom locations, duct runs, etc.) before they start.
- Schedule a pre-construction meeting with all major trades if possible.
- Stay in regular communication with your general contractor so you know if any trade is falling behind.
- Be realistic about timelines — rushing electrical rough-in to meet an arbitrary deadline often leads to mistakes and rework.
What Happens When Coordination Goes Wrong
Poor coordination is one of the most common sources of delays and extra costs in basement projects. Some typical problems include:
- HVAC ducts installed in locations that block planned lighting or outlet runs.
- Plumbing lines run through spaces where electrical boxes were supposed to go.
- Wiring damaged by other trades working in the same area without proper protection.
- Multiple inspection failures because one trade’s work created code issues for another.
These problems almost always lead to change orders, extra labor, and delays. The projects that go most smoothly are usually the ones where the general contractor actively manages coordination between trades and keeps the homeowner informed of the schedule.
Future-Proofing Your Electrical for EV Chargers, ADUs, and Smart Homes
More Utah homeowners are now thinking beyond what they need today and planning for what they might want in the future. Adding certain electrical features during rough-in is often much cheaper and less disruptive than trying to add them later after the walls are closed up.
Planning for an EV Charger
Electric vehicle ownership is growing quickly in Utah. Even if you do not own an EV yet, running the necessary wiring during basement rough-in can save significant time and money later.
- A dedicated 40–60 amp circuit with appropriate wire size is usually sufficient for most home EV chargers.
- Running the circuit and conduit during rough-in typically costs between $400 and $1,200.
- Adding the same circuit after drywall is installed often costs $2,000 to $4,000 or more because walls have to be opened and repaired.
- Many families who added EV prep during their basement project were glad they did when they bought an electric vehicle a year or two later.
Preparing for a Future ADU or Mother-in-Law Apartment
Some Utah homeowners are thinking about the possibility of creating an accessory dwelling unit (ADU) or mother-in-law apartment in their basement in the future. Adding extra electrical capacity during rough-in makes this much easier later.
- Running additional circuits and possibly a separate subpanel or meter base during rough-in can support future independent living space.
- Adding extra capacity now is relatively inexpensive compared to the cost of major electrical work after the basement is finished.
- This is especially worth considering if your basement has a separate entrance or could be easily separated from the main house.
- Check with your city about ADU regulations before investing too heavily in this option.
Smart Home and Low-Voltage Wiring
Smart home technology continues to grow. Running low-voltage wiring during rough-in is easy and inexpensive compared to trying to add it later.
- Cat6 network cable for wired internet connections is cheap to run now and provides more reliable performance than Wi-Fi in some areas.
- Speaker wire for whole-home audio systems is much easier to install before drywall goes up.
- Conduit runs for future security cameras, smart thermostats, or lighting controls give you flexibility later without opening walls.
- Many families who added basic smart home wiring during their basement project appreciated having the option to expand later without major renovation.
| Future-Proofing Option | Cost During Rough-In | Cost If Added Later | Worth It? |
|---|---|---|---|
| EV Charger Circuit (40–60 amp) | $400 – $1,200 | $2,000 – $4,000+ | Yes for most families |
| Extra Circuits for Future ADU | $800 – $2,500 | $4,000 – $8,000+ | Depends on long-term plans |
| Cat6 Network Wiring | $300 – $800 | $1,500 – $3,000+ | Yes if you want reliable wired internet |
| Speaker Wire / Whole-Home Audio | $400 – $1,000 | $2,000 – $5,000+ | Only if you plan to use it |
| Conduit for Future Low-Voltage | $300 – $700 | $1,000 – $2,500+ | Good low-cost flexibility option |
A family in Vineyard added a 60-amp circuit and conduit for a future EV charger during their basement rough-in even though they did not own an electric car at the time. Two years later they purchased one and were very glad they had planned ahead. The charger was installed in a single day instead of the multi-week project it would have become if they had needed to open finished walls, run new wiring, and repair drywall. They said the small upfront investment saved them significant time, money, and disruption later.
How Much Should You Future-Proof?
Not every homeowner needs to plan for every possible future use. The key is to think realistically about what you might actually want in the next 5–10 years.
- If you are likely to buy an electric vehicle within the next few years, running the circuit during rough-in is almost always worth it.
- If you have a basement with a separate entrance and think an ADU might be useful later, adding extra capacity makes sense.
- Basic smart home wiring (Cat6 and conduit) is relatively cheap insurance that gives you options without committing to specific technology.
- Over-investing in features you are unlikely to use can waste money that could be better spent elsewhere in the project.
Discussing your long-term plans with your electrician or contractor during the planning phase helps you make informed decisions about what is worth adding now versus what can wait.

Final Thoughts
Basement electrical rough-in is one of those parts of a finishing project that rewards good planning and clear communication. The families who end up happiest are usually the ones who asked detailed questions early, budgeted for a possible panel upgrade, and thought about future needs instead of just what they needed right now.
In Utah in 2026, electrical work is not getting cheaper. Taking the time to understand what you are actually paying for and why certain things cost more in basements can save you from unpleasant surprises later in the project.
Frequently Asked Questions
Do I need a permit for basement electrical work in Utah?
Yes. Almost all electrical work in a basement requires a permit and inspection through your local city or county building department. This includes running new circuits, installing a subpanel, or adding outlets and lighting. Skipping permits can create problems later when selling the home or if there is an insurance claim.
How long does basement electrical rough-in take?
Most electrical rough-in jobs in Utah take between 3 and 10 working days depending on the size of the basement and how complex the layout is. If your project requires a panel upgrade or subpanel, add another 1 to 3 weeks for the utility company to schedule the work and complete the upgrade.
Can I use the existing electrical panel for my basement?
It depends on the age and capacity of your current panel. Many Utah homes built before 2005 have 100 or 150 amp panels that cannot safely support the additional load from a finished basement. In these cases, you will likely need a subpanel or main panel upgrade, which typically costs between $2,500 and $6,000 installed.
Is it cheaper to do electrical rough-in before or after framing?
Rough-in is almost always done after framing is complete but before insulation and drywall go in. Doing it earlier makes it harder to know exact outlet and light locations. Doing it after drywall means cutting into finished walls, which significantly increases cost and creates more mess.
How much does a subpanel cost for a basement in Utah?
A subpanel with feeder wire usually costs between $1,800 and $4,500 installed. The final price depends on the amperage needed (typically 60–125 amps), the distance from the main panel, and whether any work is required on the main panel itself.
What happens if my electrical rough-in fails inspection?
If the inspector finds issues, you will need to correct them and schedule a re-inspection. Common reasons for failure include improper wire support, undersized circuits, missing GFCI/AFCI protection, or panel capacity problems. Fixing these issues usually costs more than getting it right the first time with a licensed electrician.
Can I do part of the electrical work myself?
In Utah, homeowners can do some electrical work themselves, but it still requires permits and inspections. However, panel work, subpanels, and anything involving the main service almost always requires a licensed electrician. Many DIY attempts end up costing more to fix than hiring a professional from the start.
How do I know if I need a panel upgrade before I start my basement project?
Have a licensed electrician evaluate your existing panel early in the planning process. They can tell you whether your current panel has enough capacity and available breaker spaces. This is especially important if your home was built before 2005 or if you are adding a bathroom, wet bar, or planning for an EV charger.
Does adding electrical work during basement finishing affect my home’s resale value?
Properly permitted and inspected electrical work that meets current code generally helps resale value. It shows that the basement was finished to code and reduces risk for future buyers. Unpermitted or poorly done electrical work can create problems during a home inspection and may need to be corrected before closing.
Basement Electrical Rough In Cost Utah • Basement Wiring Cost 2026 • Utah Basement Electrical Panel Upgrade
Bryant Bitner
Founder & Lead Project Manager, Pro-Worx Construction
Bryant leads Pro-Worx Construction and has helped many Utah families navigate the real costs of basement electrical work. He focuses on honest budgeting, code compliance, and planning for future needs so homeowners are not surprised halfway through their project.
When he is not on job sites, he enjoys helping families understand what they are actually paying for and why certain electrical decisions matter more in Utah basements than people expect.